-
Welcome to this forum . We are a worldwide group with a common interest in Birmingham and its history. While here, please follow a few simple rules. We ask that you respect other members, thank those who have helped you and please keep your contributions on-topic with the thread.
We do hope you enjoy your visit. BHF Admin Team
You are using an out of date browser. It may not display this or other websites correctly.
You should upgrade or use an alternative browser.
You should upgrade or use an alternative browser.
Renovating Stairs
- Thread starter AMW
- Start date


AMW
master brummie
Thanks Lyn. Unfortunately that's what I think may need doing too.i am no expert but you made need a carpenter in to sort out those cracks..you made need some treads replacing..good luck
lyn
im a joiner
old creaking stairs is a part of there character what
im looking at are photos of what we call the rise and go
depends if you are going to paint them or carpet them if you carpet them with a thick under lay that will reduce the creaking you hear as long as you have no dry rot or worm you don t have a safety issue
it is hard to see any
problems by looking at photos
Last edited:
AMW
master brummie
Hello Donbogenim a joiner
old creaking stairs is a part of there character want im looking at are photos of what we call the risr and go
depends if you are going to paint them or carpet them if you carpet them with a thick under lay that will reduce the creaking you hear as long as you have no dry rot or worm you don t have a safety issue
it is hard to see any
problems by looking at photos
If I remember rightly you gave me that lovely comment on restoring my wooden kitchen worktops, thank you
")
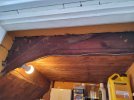
I don't mind the creaking, as you say it is part of their character. I removed the carpet and carpet strips and this is what I am left with. Ideally I would like to return them to oiled/stained solid wood. With the stairs I have concerns about safety I guess.
Picture 1 shows the cracks in the riser on the second step, and the second step moves up and down when trod on due to the bit missing between the second and third step on the left hand side.
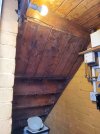
Picture 2 shows the cracks in the overhang of the treads.
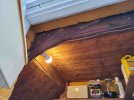
Picture 3 shows another crack across the riser.
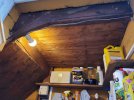
Picture 4 & 5 shows the cracks across the treads.
I'm not sure if these are dangerous or could I repair them in any way?
I really enjoyed the kitchen worktop project and wondered if I could apply what I learnt to the stairs.
Also could I ask what face protection I should be using for these sorts of jobs please, and would you know how to get rid of black 1930's varnish from skirting boards?
Sorry to ask you so may questions.
Best wishes
Alison
Hi Alison
about the cracks can you access under the stairs so you can see the wedges if any
like i said if theres no rot or worm that be good news
if theres only slight movement with the go and you what to stop movement you could fix a piece of timber to the underside of the go thats if you can access it that crack has more then likely been there for many years
if you are sanding or striping its best to wear a mask and eye protection
Regards
Don
AMW
master brummie
Steps 2 and 3 seem to have the most problems. When the stair is stepped on the crack seems to open up and the crack/gap comes apart. I'm not sure if this is repairable in anyway or the whole tread needs to be replaced. There doesn't appear to be any woodworm and the rest of the stairs are in good shape. I do have access to the underneath of the staircase.


Yes maybe that tread needs replacing can be a bit tricky as it is housed into the string on both sides
but like i said it could be strengthed by fitting timber section under the tread supported 2"x1" bearers fitted to the string
using wood glue as well i do say your best bet is to do the repair under the tread as it will be invisible
but like i said it could be strengthed by fitting timber section under the tread supported 2"x1" bearers fitted to the string
using wood glue as well i do say your best bet is to do the repair under the tread as it will be invisible
Richard Dye
master brummie
That should be a good plan. Make sure the 1” dimension is to the stair tread and the 2” dimension down. If you can get 21/2” that would be a little stiffer. Make sure you keep good pressure on the stiffener until the wood glue dries.Yes maybe that tread needs replacing can be a bit tricky as it is housed into the string on both sides
but like i said it could be strengthed by fitting timber section under the tread supported 2"x1" bearers fitted to the string
using wood glue as well i do say your best bet is to do the repair under the tread as it will be invisible
My personal preference would be to strip the treads and apply a couple of coats of polyurethane stain. We did that 8n a couple of houses, it always looked good and withstood many many small feet running up and down!
Good luck….
Eric Gibson
master brummie
Looks like a job for the chaps on the BBC Repair Shop programme, doubt you'll get it there though,
AMW
master brummie
Looks like a job for the chaps on the BBC Repair Shop programme, doubt you'll get it there though,

Richard Dye
master brummie
Zooming on my iPad, it does not look like the boards (boxing is structural) as the boards on the horizontal sections are nailed on top of the stairs (bottom). I would take one board off in the area you need and see how it looks. Difficult to see from a photo. If this is too difficult for you, you might want to get a contractor to do this part.Hi the tread I want to get at appears to be boxed in somehow.
Remove the boards taking care as you do soZooming on my iPad, it does not look like the boards (boxing is structural) as the boards on the horizontal sections are nailed on top of the stairs (bottom). I would take one board off in the area you need and see how it looks. Difficult to see from a photo. If this is too difficult for you, you might want to get a contractor to do this part.
i advise you get someone to repair tread in question its not a big job well not to me anyway maybe just over a hours work
im making a flight of new stairs for a hotel at the moment
its sad but i have kept count of how many stair i have made and fitted it stands at about 30 + as i sign them and date them as with all my work
these may be the last stair case i do
Let me know how you get on
Richard Dye
master brummie
Excellent advise!Remove the boards taking care as you do so
i advise you get someone to repair tread in question its not a big job well not to me anyway maybe just over a hours work
im making a flight of new stairs for a hotel at the moment
its sad but i have kept count of how many stair i have made and fitted it stands at about 30 + as i sign them and date them as with all my work
these may be the last stair case i do
Let me know how you get on


AMW
master brummie
Thanks for your replies Richard and Don.
I guess if I had a look at it I would have to prise open the wood to start with somehow?? then work out what I needed to do. This part may have to wait awhile till I can afford to get someone to take a look. In the mean time I will carry on paint stripping the stairs which is hard work but satisfying.
Don... how marvellous dating and signing your work for people to find in the future. You must be incredibly skilful making flights of stairs for hotels! Hope you take a photo of them too. I was just thinking about the genealogical aspect of signing them too and a family relative finding them... the thought is amazing!
Ok
Thanks for your comments ref me signing completed work
im sure if you can fix a timber section to the underneath of the tread using glue and screw the timber to under side of the tread and the riser if needed also you can metal angle brackets to the riser and the tread underneath the crack on upper surfaces will remain but thats part of the character let me know how you get on
Richard Dye
master brummie
It looks like from the photos you will need to remove two pieces of wood in the under-stair cupboard. Following Dons lead I would also try to get a couple of long screws into the riser which has a split which needs closing. Then stiffen the tread. The riser first then the tread.
Good luck with the paint stripping, be careful in case there is any lead based paint. You don’t want to be inhaling any of that stuff!
Good luck with the paint stripping, be careful in case there is any lead based paint. You don’t want to be inhaling any of that stuff!
AMW
master brummie
Thanks Richard for your advice, and thanks for your help regarding the kitchen work surfaces too. I really didn't have a clue where to start with that project. I really appreciate both yours and Dons help. Which two pieces of wood do you think I need to remove please?
Thanks for the hint about lead based paint. I think there probably is. I have bought disposable PP2 masks. I don't really know where to store the mask when I have a cuppa or lunch.
Also the banister has a curved shape to it and I am not sure how to remove the varnish.
Thanks for the hint about lead based paint. I think there probably is. I have bought disposable PP2 masks. I don't really know where to store the mask when I have a cuppa or lunch.
Also the banister has a curved shape to it and I am not sure how to remove the varnish.
Not sure what 2 pieces of wood you mean as i said the the tread is housed into the string the tread is also housed into the base of the riser i do not recommend any removing of treads yes i could do it
please just reinforce from underneath as i said
regarding handrail curve paint stripper with wire wool or gloves you need to don mask and goggles
idont have time at moment but in a few days i can send you a drawing how to do the repair made simple
please just reinforce from underneath as i said
regarding handrail curve paint stripper with wire wool or gloves you need to don mask and goggles
idont have time at moment but in a few days i can send you a drawing how to do the repair made simple
Richard Dye
master brummie
Don, I think the pieces of wood are those under the stairs so that the underside of the stairs can be seen. I would take the one right above the light bulb being careful and the look at what access you have an other board to remove. Difficult from a photo. Follow Dons directions on the paint striping, There is a rectangular tool sold in the US and I am sure there that helps you get in the nooks and crannies that I would recommend.Not sure what 2 pieces of wood you mean as i said the the tread is housed into the string the tread is also housed into the base of the riser i do not recommend any removing of treads yes i could do it
please just reinforce from underneath as i said
regarding handrail curve paint stripper with wire wool or gloves you need to don mask and goggles
idont have time at moment but in a few days i can send you a drawing how to do the repair made simple
Richard Dye
master brummie
Hi Alison, As far as stripping the paint off, whether by paint stripper or burning it off you will need a good scraper. I have just looked on line at B&Q and they have a great variety. You will need one where you can get into the corners easily. There is a 100mm steel floor scraper at £4.99 but there are some carbide edged ones which will last much longer. but of course are dearer. If ou can get to a B&Q store there is always someone there to give advice
Richard Dye
master brummie
Good luck! There are some environmentally friendly liquid strippers available if you need them.Thank you. I got a general purpose scraper from Toolstation which is good, but the Hyde scraper would be great for the banister. I'm not using a heat gun or paint stripper. Really appreciate your help and suggestions.
AMW
master brummie
Thanks for asking. I'm afraid it is going rather slowly. I have stripped off the paint so far. I need to mend the treads properly and fill in any holes, then decisions, decisions, decisions.... I was thinking of keeping the stairs all wood, or paint the risers white and and keep the stairs wood. I have also noticed that there are still markings where a runner once was. So should I get a runner???? or could I tint the stair so it is all one colour.