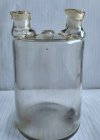
Always loved laboratory/scientific glass - preferably empty of any dodgy contents of course. Viv.
-
Welcome to this forum . We are a worldwide group with a common interest in Birmingham and its history. While here, please follow a few simple rules. We ask that you respect other members, thank those who have helped you and please keep your contributions on-topic with the thread.
We do hope you enjoy your visit. BHF Admin Team
You are using an out of date browser. It may not display this or other websites correctly.
You should upgrade or use an alternative browser.
You should upgrade or use an alternative browser.
Viv,
Perhaps you will like this. Woulf bottle manually made, no standard joints . Rescued lab equipment that was originally at Somerdale the lab there was having a clearout . Have 2 of them. I think it would have well predated the lab glassblower at Bournville (Bill Blower - Truely the name , It is a black country name ) Certainly pre WW2, likely pre WW1
Perhaps you will like this. Woulf bottle manually made, no standard joints . Rescued lab equipment that was originally at Somerdale the lab there was having a clearout . Have 2 of them. I think it would have well predated the lab glassblower at Bournville (Bill Blower - Truely the name , It is a black country name ) Certainly pre WW2, likely pre WW1

Great piece of glass Mike. Would never have occurred to me that Bournville had its own glass blowers. Viv.
Only one, and he retired in the 1970s. He had a little sideline. For those he had contact with and knew who got married he would make them a small glass giraffe. The tradition was that if if it later got broken , then a pregnancy would soon happen. (though I wonder if that was a story spread by Bill to ensure people took care of it!!)
As I said, I think the bottle predates him, as his work was much better.
As I said, I think the bottle predates him, as his work was much better.
Pedrocut
Master Barmmie
Registered designs for ornamental modern window glass / Chance Brothers & Co., Glass Works, near Birmingham.
Publication date 1867

Publication date 1867

Registered designs for ornamental modern window glass / Chance Brothers & Co., Glass Works, near Birmingham : Chance Bros & Co. : Free Download, Borrow, and Streaming : Internet Archive
For full bibliographic record see our Library Catalogue
archive.org
Annie Murray
master brummie
A question for anyone who knows about glass making please! Does anyone know the name of the thing you carry glass around on, say to the Lehr/annealing over - a rod with a flat ?wooden part on the end - a bit like you would use for a pizza oven? I would be very happy to learn this if anyone knows. Many thanks, Annie
Radiorails
master brummie
Maybe this will help?
Steps (How To Make Glass Art At Home Or In Studio)
When you break it down, the process of glass making is simple and tends to follow these steps:- Create a pile of molten glass by mixing some ingredients (usually filtered sand, potash, soda ash, and limestone, but other ingredients may be used as well, depending on the object you’re trying to make);
- When this mix has reached its melting point (usually 2000 °F, or 1100 °C) collect some of it with the help of a special rod called the blowpipe, by dipping it (multiple times if needed) into the pile of molten glass. How much you gather on your blowpipe depends on what you are trying to create, so 2 or more gatherings may be needed if you’re working on more complex objects which require a bigger quantity of glass;
- After you’ve gathered enough molten glass on your blowpipe you blow air into the newly gathered dollop while constantly rotating the blowpipe on the marver. This continuous spinning of the blowpipe on the marver, combined with blowing air into the chunk of molten glass allows you to create a very basic shape of what you want, whether it’s a vase, bowl, mug, or an abstract object. In this step you can also tweak the shape of your object by pulling at the glass with specialized tools;
- (Optional) If you wish to create colorful objects now is the time to do it. At this point in the shaping and air blowing process artists usually add colors to their objects, creating visually pleasing pieces. Adding colors can be accomplished through several different techniques that allow you can create thousands of different hues and textures;
- When the desired shape has been achieved, and the colors have been added in, the next step is to transfer the shaped glass onto a different rod (which is usually made of graphite, or stainless steel). This special rod serves quite a few purposes, depending on the project you’re working on, but most of the time it allows you to work on the top of your piece by keeping the bottom stuck to the rod. This tool also facilitates the creation of handles, and adding decorations to your object;
- After all of these steps have been done correctly the piece of glass is then inserted into the glory hole for further heating (reheating the object in the glory hole will keep it from breaking or shattering) and to be prepared for the final stages;
- The final stages include adding last minute details or shapes to the glass, adding handles (if you’re creating vases for example), and other decorations;
- Lastly, the finalized piece is then inserted into a special oven where it’s gradually being cooled down to avoid breaking.

Additionally, other ingredients may be also included in the basic setup, or added as an extra, as some projects need a different setup, require different supplies, or a different sequence of tasks to be performed.
Last Chance
proper brummie kid
Following on from the launch of Chance Reflections, Volume 1, I am pleased to announce that the second volume is now available to download.
Volume 2 can be downloaded directly from www.chancebrothers.uk and the PDF can be seen listed on the homepage. I hope you enjoy it.
There are eleven volumes in all, and these will be uploaded as and when available.
I would like to take this opportunity to thank:
Dr Malcolm Dick, OBE for copy-editing the book.
Henry Chance for his forensic proof-reading.
Giles Chance for suggestions and amendments.
About …
Having emerged from the first turbulent fourteen years, the prospects of Chance Brothers grew from strength to strength.
Experiments were carried out on ornamental glass and this proved to be inspirational, with many varied designs that received praise.
The seed of an idea to develop optical glass, already inhibited by Excise Duty, suddenly blossomed once the Duty was repealed. Success was swiftly rewarded with sales on the home and European markets.
This led to Chance Brothers' most important and enduring product: that of lighthouse engineering to compete with the French dominance in this market.
During 1850 the Company was awarded a contract to glaze the largest exhibition hall in the world: the Crystal Palace.
Pedrocut
Master Barmmie
Their main role in India from 1860 was to supply Fresnel lenses, lanterns and complete lighthouse installations.
Equipped lighthouses along the Bay of Bengal, Arabian Sea and inland waterways.
Examples…
Colaba Point (Mumbai)
False Point (Odisha)
Saugor Island (nr Calcutta)
Multiple beacons on the approaches to Karachi and Madras.
Many of these lights were manufactured entirely in Smethwick, shipped out in sections, and assembled on site by Chance Brothers engineers.
Last edited:
Pedrocut
Master Barmmie
Supplied signal lenses, glass made to withstand intense heat and dust for Indian Railways.
Large sheets of rolled plate for public buildings.
Rolled cathedral glass and roof glazing for stations like Bombay Victoria Terminus (now CST) and Howrah station concourse roofing.
Mombay Victoria, quite a building !

Large sheets of rolled plate for public buildings.
Rolled cathedral glass and roof glazing for stations like Bombay Victoria Terminus (now CST) and Howrah station concourse roofing.
Mombay Victoria, quite a building !


